Learn MVC with a simple project using Node, Express, MongoDB - < For those who have just started to learn MVC >
In this post I will write about how we can build a full-stack application using Node, Express and Mongo and incorporate the MVC pattern into it.
Table of contents
Create a github repo with a README.
Clone the repo on your local machine.
Open the project in VS-CODE.
In the terminal, type npm-init to create the package.json file.
Install dependencies -
npm i express --save
npm i mongoose --save
npm i dotenv –save
npm i ejs --save
Install dev-dependencies
npm i nodemon --save-dev
npm i cross-env --save-dev
Now go to package.json and make the following changes in the scripts -
"scripts": {
"start": "cross-env NODE_ENV=production node app",
"dev": "cross-env NODE_ENV=development nodemon app"
},
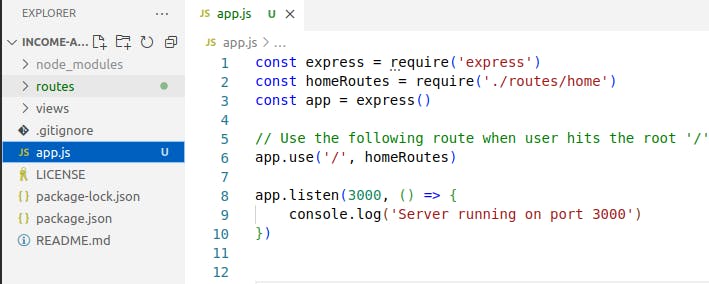
Create app.js in your project directory. In your app.js create the basic server using express.
Routes and Controllers
Now, experiment your routes by creating a routes folder inside your project, and also updating your app.js to the specific route as shown below -
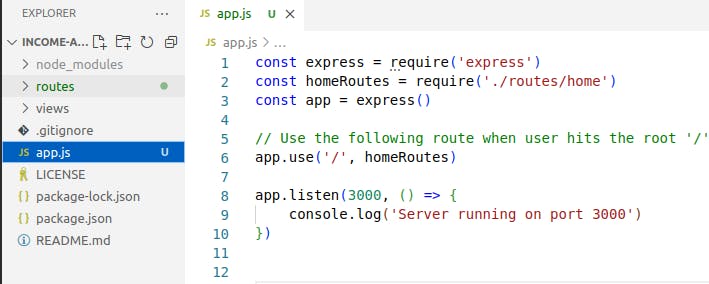
Line #6 tells the server that all of the root (‘/’) route requests should use the homeRoutes. As we can see in the code above, the homeRoutes is a variable that holds the route to the routes/home.js file. This file tells us which controller is responsible for the current request. The code -

So, in routes/home.js we are doing nothing but specifying the controller, as to which controller is responsible for the current request. Here, in this example, the homeController is a variable that is holding the controller named controllers/home.js. Furthermore, we can see that if the request is a get request, and it’s on the root(‘/’), then the router hands off the request to the controller which in this case will be homeController.getIndex. This will lead to executing what’s written on that function (will see below). And finally, whatever is the result of the execution of the controller function, we export it (which the app.js file receives).
Now, let’s get inside our controller folder. Create a file home.js. This file is what is referred to as the homeController variable in the above step***.*** Write the following code inside controllers/home.js -
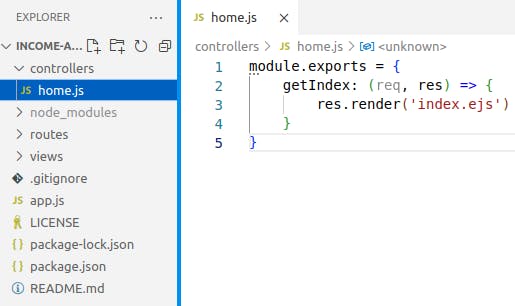
Now, a couple of things to notice here. The code above has an object, which contains a method getIndex.
Note : the getIndex is a method coz it’s a part of the object, and as a value it has a function, so the getIndex must be a method. Also the getIndex method on execution renders a view template named index.ejs (we will soon see where we use ejs).
Views
For the controller to render the index.ejs file, we must have that file in our views folder. So inside our main project directory, let’s create a views folder and inside that folder let’s create a file named index.ejs. (Note : The extension is ejs because we will be using ejs as the template engine in this example). Let’s write the following code in index.ejs -
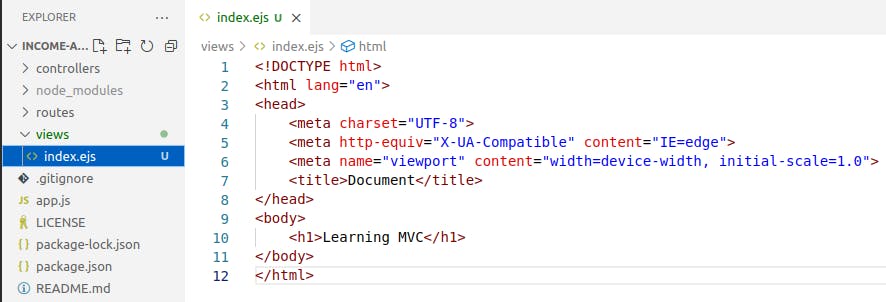
Note that as of now we haven’t added anything fancy to our ejs template. Template engines like ejs have their style of writing data. But in the above case we haven’t yet incorporated any such styles. As for now, we are just trying to see whether or not our view is getting rendered. So finally if we start our server and run our app we can see the following in the browser -
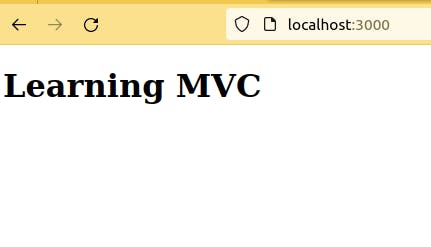
** So we have seen how these folders that we created viz. routes, controllers and views, help us in organizing our code. So when we talk about following the MVC pattern, we are exactly doing the same thing that we just did. But we have not yet discussed the model (M). Not to worry, we will check that too by continuing with this example in the next few steps. But before bringing models into the scene, I want to summarise what we just did, so that you have a clear picture of the process in your mind.
The story so far..
A request comes from the user to the server (let’s say a simple GET request for the landing page of a website)
The request is handled by our
app.js. It checks the request and if the request matches any routes it checks for the appropriate router. In our example, the root route (‘/’) is handed to homeRoutes which has the pathroutes/home.jsInside the
routes/home.jsit is further decided as to which controller will take over the request. Since the request was a GET request and the route was the root route (‘/’), the homeController (which has a path tocontrollers/home.js) will handle the request. We also specify the particular method within the controller to handle the request (in this casehomeController.getIndex).
The controller then renders the view that we have created in views/index.ejs
Models
Let’s move to understanding models and what they do in MVC. Models are files that are kind of a blueprint of a database table or collection. We can use the Mongoose library to interact with our database by telling Mongoose which model to work with. We create all the model files inside a separate folder named models. Let’s extend the above example to see where and how we can use models in our application and why it can be a good move. Let’s create a new folder ‘models’ inside our project directory. Create a file Course.js inside the models folder.
Now write the following code inside this file -
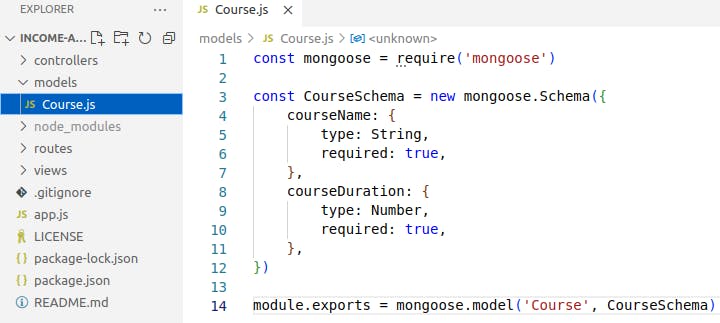
In the above code, what we have done is created a blueprint of our database collection which is to be named course in MongoDB (and hence we have named the model Course.js). This model contains all the details about what our collection should be like. So it specifies the necessary details like field name, the data type of the field, whether it is a required field or not and so on (we can keep adding fields and details within the model). The Mongoose library (which we have imported in this file line # 1), will check this model and automatically create a collection in MongoDB.
Now to show how models fit into the picture let’s just continue with our project. In your views folder, create a sub-folder named course. We shall put all our course-related views inside this sub-folder. Let’s create course.ejs and add the following code inside -
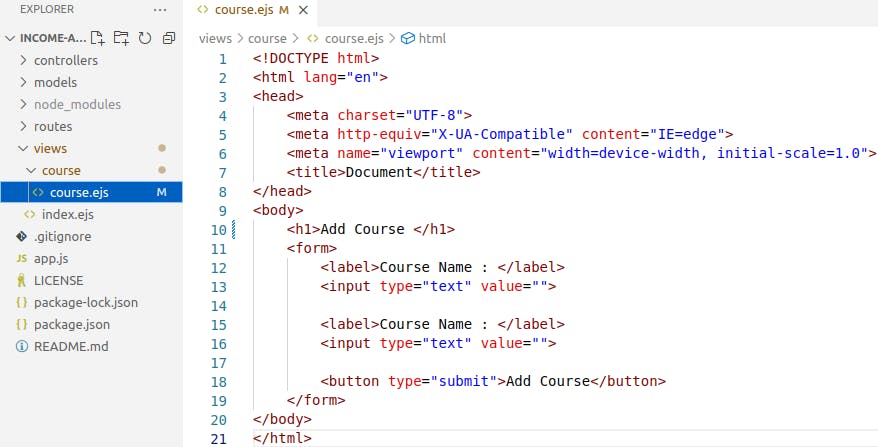
Now just like we did earlier, we shall add the route for the request to the course. Let’s create a route (routes/course.js) and a controller (controllers/course.js) for the same. Check out the following code for the specific files -
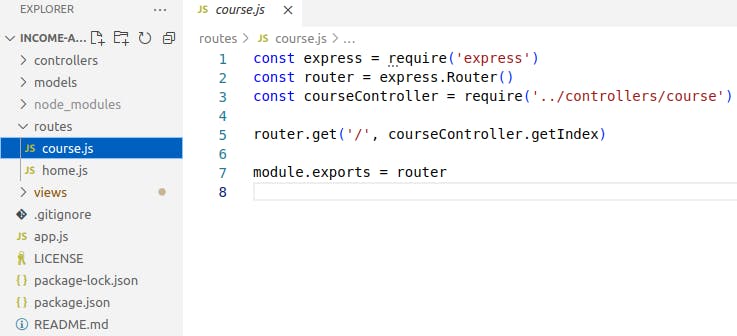
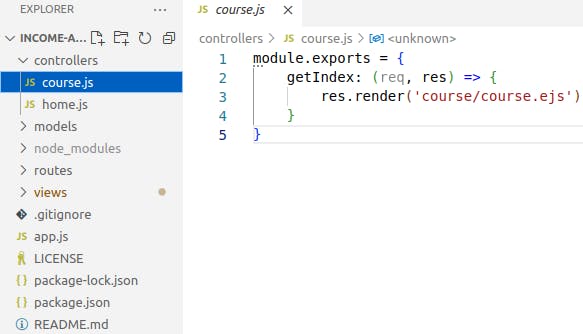
Now when we go to localhost:3000/course, we get the following as output -
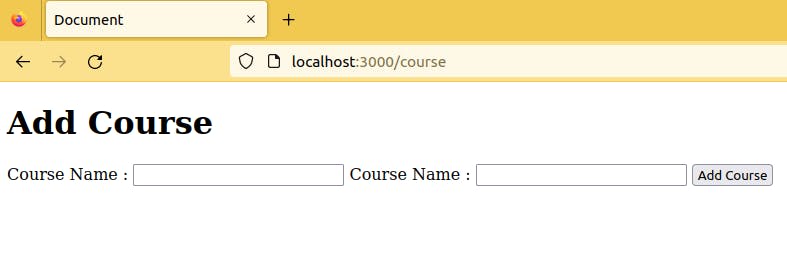
This means that the course.ejs on our /course route with the GET request was successfully rendered.
To summarize, we have set a custom route /course, which will be handling all the routes that begin with /course. In the above example, we have seen how we have handled a GET request on the custom /course route. Below we shall take a look at how to handle a POST request with the custom /course route and also see how models come into the picture.
Remember earlier we had created a model Course.js in the models folder. We will use this model next.
Let’s take a look at the views/course/course.ejs we had created earlier. Make the necessary changes in the form as shown below -
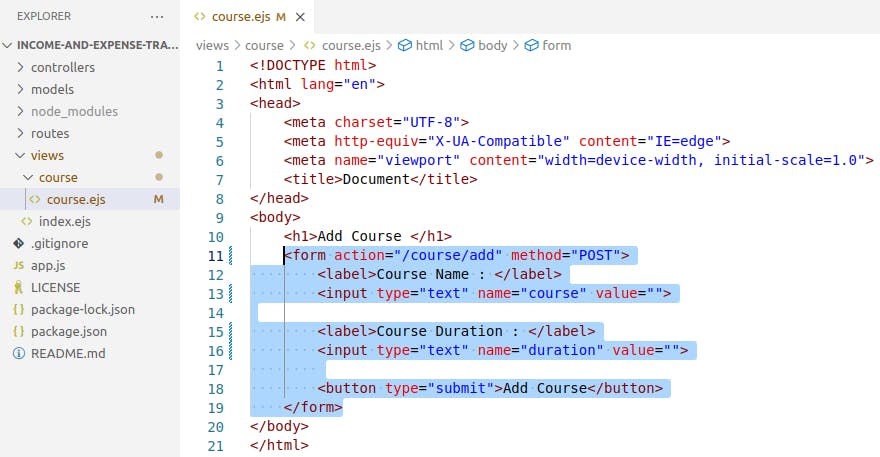
In the code above we can see that we have added the action to a specific route here (i.e., course/add) and also note that the request method we have set to POST. Also note that we have a name attribute associated with each input. These name attributes will be passed as request bodies.
Now since this is a course/ route, therefore our routes/course.js will handle it. Inside routes/course.js we have to specify which controller should handle this request. Currently, our route doesn’t know what to do with the POST request coz that is not specified inside the route. Therefore we add the following line of code in the routes/course.js -
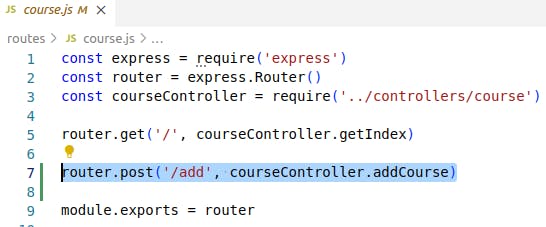
The courseController handles the request and specifically, the addCourse method is targeted. We will now write the code for addCourse method inside the courseController
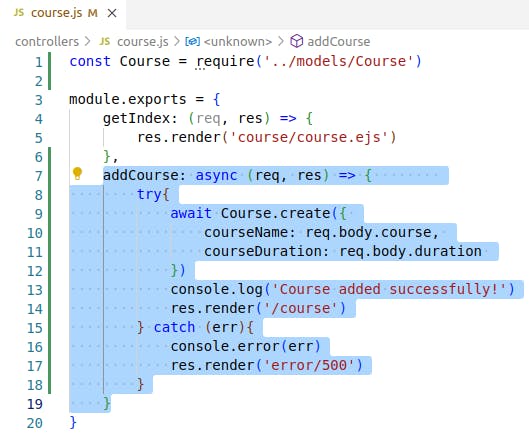
The above-highlighted code takes in the form values and inserts them into the MongoDB database. It does so with the help of the Mongoose library and the models that we have created. In line #7 of the above code, we can see Course.create, here Course is the model that we created earlier and create is a Mongoose function that creates a document in our MongoDB database collection. So in this instance, we can see the use case of models in MVC.
But we forgot one important thing here. It’s the database connection that we haven’t yet made. So you can follow the following steps to create a MongoDB collection -
Go to mongoDB Atlas website and sign in with your account.
Create a new project for mongoDB
Click on Build a database
Deploy your database (use the FREE tier)
Name the cluster and click CREATE.
Set user info and other network permissions
Once you’re done with these steps, you can then get your connection string by clicking on Connect button
Copy the connection string (we will use it in our application next)
Next, create a config folder inside your project directory, also create two files – one being .env and the other one database.js
We shall paste the connection string (that we copied from MongoDB) in the .env file as shown -

Also in the database.js file write the following code to create the connection -

Note, in line# 7 of database.js, we have used the DB_STRING from as it is an environment variable holding the connection string. We then use Mongoose to establish the connection. The connection when established will be stored in a variable connectDB (line# 4). Now we need to use this connection in our app.js file, so now our app.js looks something like this -
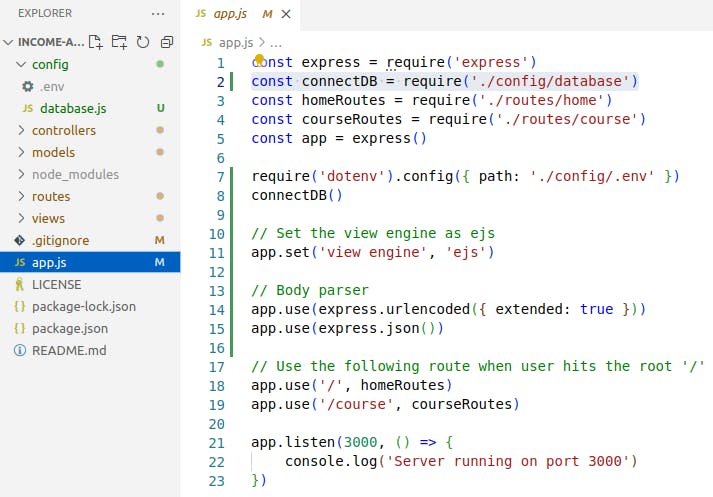
In line# 2 of app.js, we can see that we have imported the database connection. This allows us to invoke the connectDB method. Additionally, we have also required the dotenv package which handles the environment variables that we have set up in config/.env
We also add the body parsers (see line#14 and 15).
We are almost done ! We can now run our application. Let’s type npm run dev or npm start on our terminal, then in our browser let’s go to localhost:3000/course, you will see this -

Now, fill in some values in the input box like -

After pressing the Add Course button, you must be redirected to the /course route, which means your form data was successfully added to the database. You can check your database collection and you will find a new document on the courses collection was inserted. Also on your terminal, you can find a message saying ‘Course created successfully’ must be logged. If there’s any error while inserting the data, you must get a 500 Server Error page.
Alright! So let’s summarize everything once again -
The user requests the server, the app.js file receives the request and checks for the specific route. The routes decide which controller should handle the request based on the request method and the requested route. The controller (whichever is assigned the task of handling the request) will talk to the models (if the request has anything to do with the database) or it will talk to the views to render some HTML concerning the specific request.
So this is how MVC-based projects are planned (mostly).
I hope this article helps you to get started with MVC. I would suggest you to implement what you have learned here and work on similar small ideas to get the pattern into your brains.
Thank you! Keep practicing.
Photo by Joel Fulgencio on Unsplash
